
· 7 min read

Virtual staging is the process of digitally adding furniture, decor, and other elements to photos of empty or sparsely furnished spaces. Along with Stable Diffusion, it can significantly improve real estate listings by creating realistic and attractive virtual staging.

Digital staging transforms cold, empty rooms into warm, inviting spaces that help buyers emotionally connect with a property. A 2023 report by Realtor.com found that staged homes sell 88% faster and for an average of 20% more than non-staged homes.

Why Virtual Staging Is Needed

  • Empty spaces lack appeal: Unfurnished rooms can appear cold and uninviting, making it difficult for potential buyers to visualize themselves living in the space.
  • Traditional staging is expensive: Physically staging a property requires furniture rentals, which can be costly and time-consuming.
  • Showcases potential: Virtual staging allows showcasing a space's full potential. Buyers can see how furniture can be arranged and how the space can function for their needs.

Advantages of Using Astria.ai for Virtual Staging

The advantages of using Astria.ai for virtual staging are many:

  • Cost-Effective: Compared to traditional staging, Astria offers a much more affordable way to virtually stage a property.
  • Speed and Efficiency: Astria can generate virtual staging variations in minutes, allowing realtors to experiment with different styles and layouts.
  • Customization: With clear prompts and descriptions, it can create virtual staging that reflects the property's style, target demographic, and current design trends.

Astria.ai simplifies virtual staging by harnessing cutting-edge AI technology, making it effortless to digitally stage listings with realistic results. Here's how Astria.ai achieves this:

  1. Controlnets: Users input text descriptions to control the composition, style, and content of the staged photo.
  2. MLSD (Multi-Level Scene Description): Breaks down a room into its components, ensuring realistic staging.
  3. Compositional Understanding: AI arranges furniture and decor based on interior design principles.
  4. Backend Version-1: Proprietary machine learning infrastructure enables fast, high-quality staging.

Backend Version-1 improvements include:

  • Hi-Res (Super-Resolution Details) for sharper images.
  • Faster processing times.
  • Better handling of multiple LoRAs.
  • Improved results with DPM++/Karras and DPM++SDE/Karras samplers.

Multi-Controlnet, available only for Backend Version-1, combines multiple Controlnets for better consistency and precision.

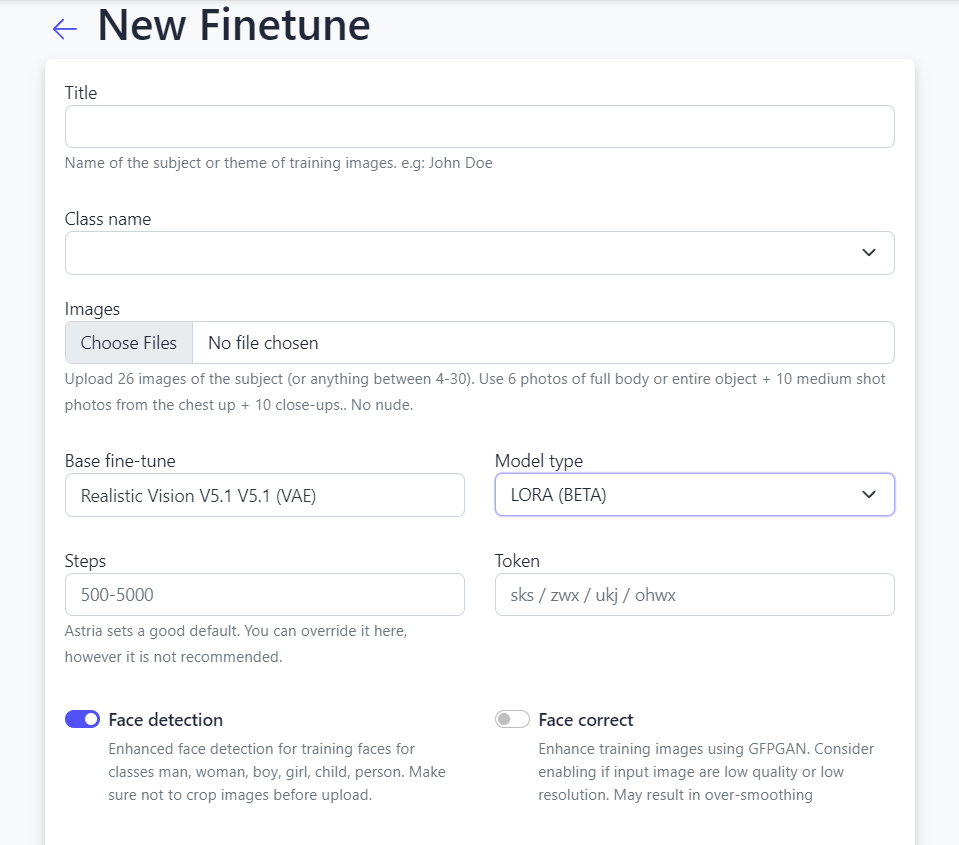
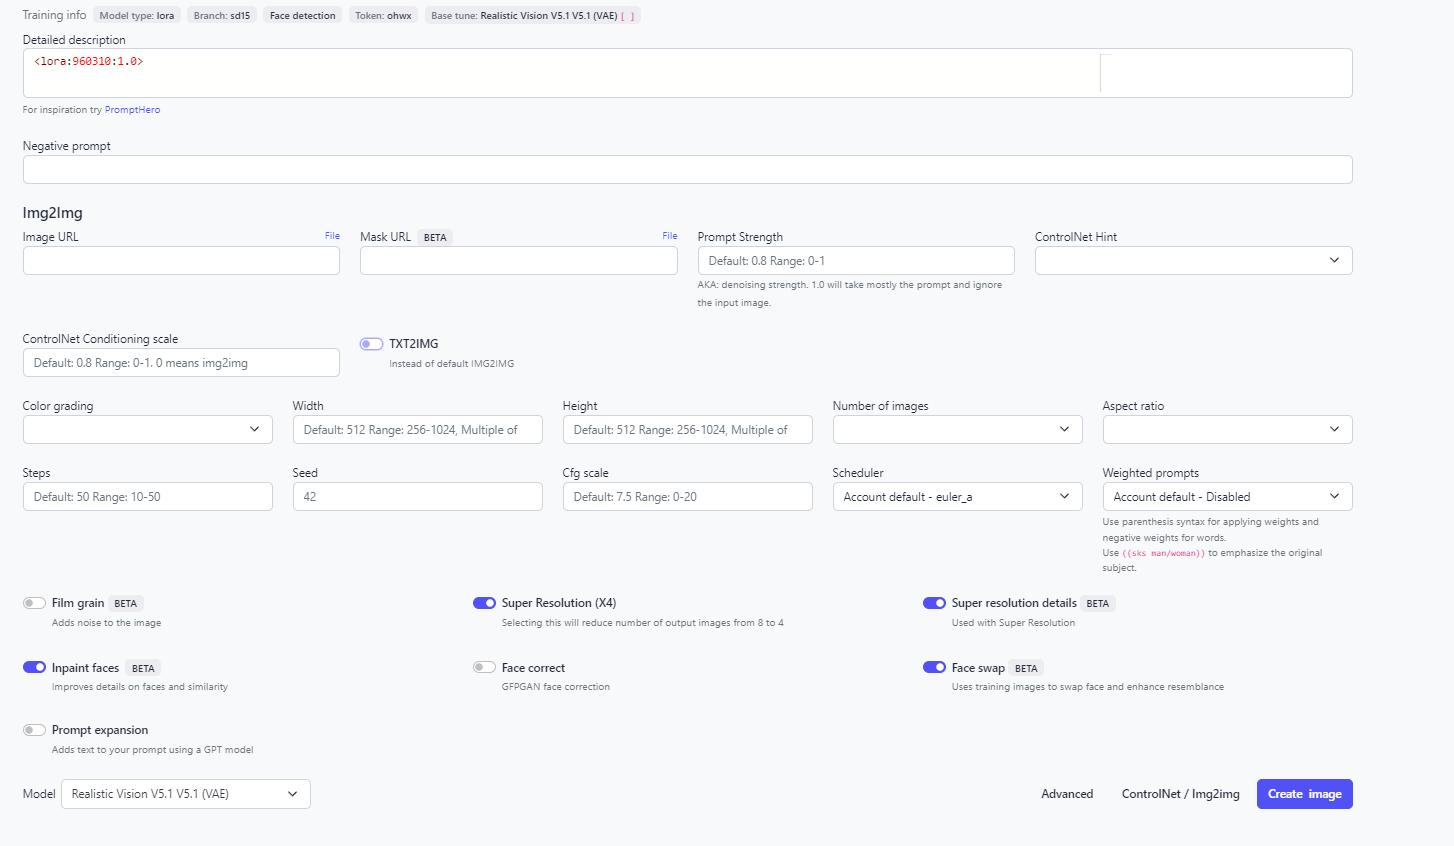
How to Use Astria.ai

  1. Sign up at Astria.ai.
  2. Go to https://www.astria.ai/prompts.
  3. Select Advanced and ControlNet/Img2Img Option.

alt_text

  1. Upload your image using Choose File.
  2. Select 1 - BETA under Backend version.
  3. Write out a description under Detailed Description and add “-- controlnets MLSD” at the end of it. --controlnet_weights 0.5 gives the best results.
  4. Also use --mask_prompt windows door --mask_invert, to make sure that the windows and the doors are preserved from the original image.
  5. Additionally you can add a few Loras as suggested in the docs here to improve the overall quality of the image.
  6. Click Create Image.

Easy Hacks to Enhance Your Listings

  1. Gather High-Quality Photos: The process works best with clear and well-lit photos of the empty rooms.
  2. Define the Virtual Staging Style: Consider the property's target audience and the overall feel you want to create (modern, traditional, family-friendly etc.).
  3. Craft Text Prompts: Provide detailed descriptions of the desired furniture, decor, and overall ambiance.
  4. Generate Variations: You can generate multiple virtual staging options to choose from, allowing for A/B testing to see which resonates best with potential buyers.
  5. Refine and Integrate: Minor adjustments might be needed to ensure a seamless integration of the virtual staging with the original photo.

Virtual Staging Applications on Astria.ai

In this section, let’s look at how you can actually use Astria to transform empty spaces into vibrant, inviting rooms.
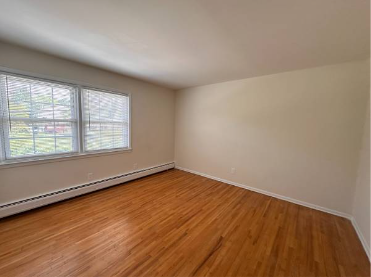
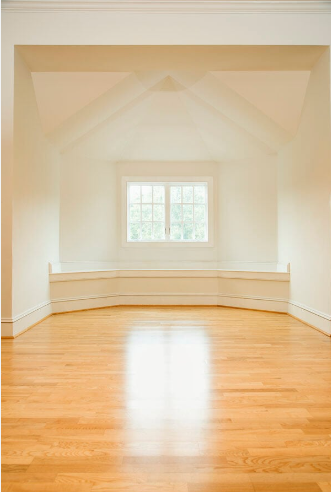
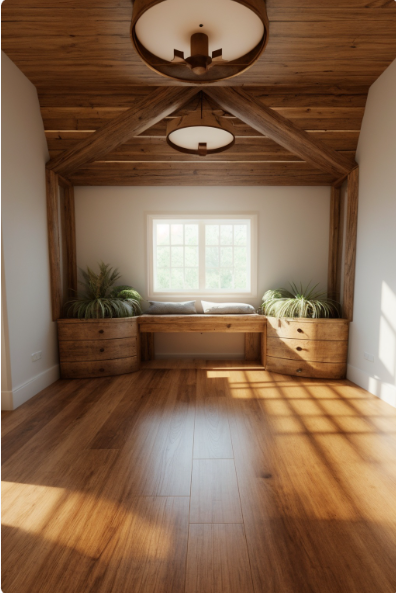
See below:

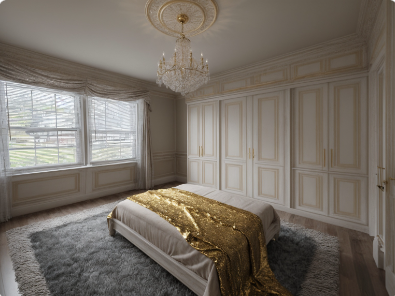
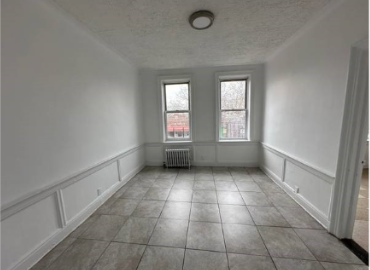
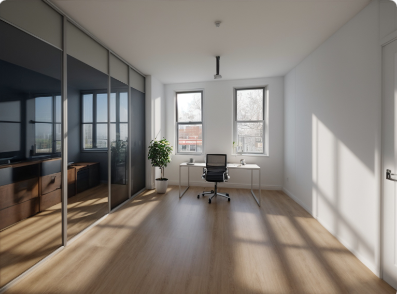
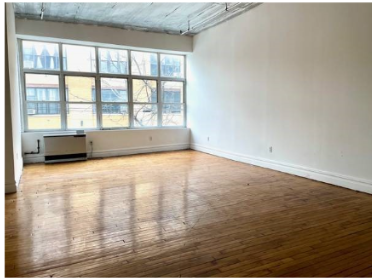
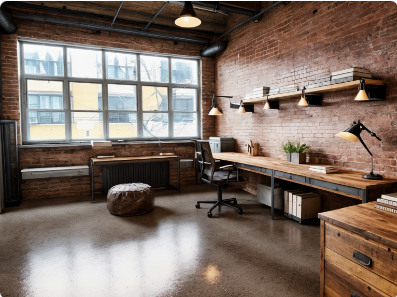
Original Image => AI Generated Image by Astria.ai

A serene and opulent private bedroom, featuring a plush king-size bed with a tufted velvet headboard and a delicate crystal chandelier above, surrounded by richly textured walls in a soothing gray tone, and a lavish area rug in a soft, creamy color, with a comfortable reading nook by the window, complete with a oversized armchair and a matching ottoman, and a spacious walk-in closet with custom cabinetry and a marble-topped dresser, all bathed in a warm, golden light, in a 3D rendering style <lora:epi_noiseoffset2:0.5><lora:FilmVelvia2:0.5><lora:add_detail:0.5><lora:epiCRealismHelper:0.2> --mask_prompt windows door --mask_invert --controlnets mlsd --controlnet_weights 0.5

image

image

A modern office room with a minimalist aesthetic, featuring a sleek wooden desk with a silver laptop and a ergonomic chair, surrounded by floor-to-ceiling windows with a cityscape view, and a few potted plants on a shelf, with walls lined with tall cabinets filled with neatly organized books and files, and a subtle warm lighting and a hint of natural light, in a 3D rendering style <lora:epi_noiseoffset2:0.5><lora:FilmVelvia2:0.5><lora:add_detail:0.5><lora:epiCRealismHelper:0.2> --mask_prompt windows door --mask_invert --controlnets mlsd --controlnet_weights 0.5

image

image

A contemporary office space with an industrial chic vibe, featuring a reclaimed wood desk with a vintage-inspired lamp and a worn leather office chair, surrounded by exposed brick walls and polished concrete floors, with a floor-to-ceiling metal shelving unit filled with vintage books and decorative objects, and a large glass door leading to a private outdoor patio with a city view, in a 3D rendering style <lora:epi_noiseoffset2:0.5><lora:FilmVelvia2:0.5><lora:add_detail:0.5><lora:epiCRealismHelper:0.2> --mask_prompt windows door --mask_invert --controlnets mlsd --controlnet_weights 0.5

image

image

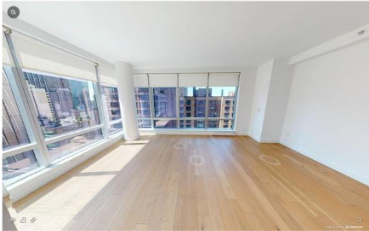
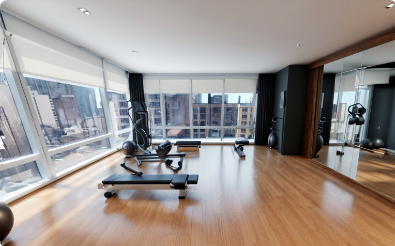
A sleek and modern home gym, featuring a spacious open floor plan with high ceilings and large windows allowing for natural light, equipped with a variety of high-end exercise equipment including a treadmill, stationary bike, and free weights, surrounded by mirrored walls and a polished wood floor, with a comfortable seating area for relaxation and a large flat-screen TV for entertainment, and a modern sound system for an immersive workout experience, in a 3D rendering style

image

image

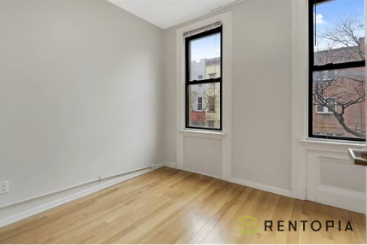
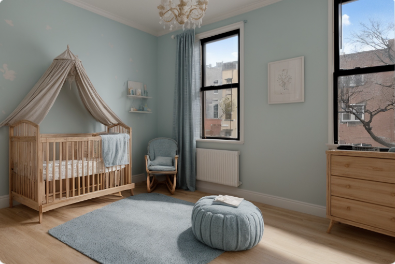
Coastal-themed nursery: an empty room staged as a serene coastal-themed nursery with a white crib, soft blue accents, shiplap wall, and nautical decor elements – controlnets MLSD Composition

image

image

A peaceful and calming meditation room, featuring a serene and minimalist space with a focus on natural materials and textures, including a reclaimed wood floor, a stone feature wall, and a live edge wooden meditation bench, surrounded by floor-to-ceiling windows allowing for an abundance of natural light and a connection to nature, with a few carefully placed plants and a subtle water feature creating a sense of tranquility, and a soft, warm glow emanating from candles or string lights, in a 3D rendering style &lt;lora:epi_noiseoffset2:0.5>&lt;lora:FilmVelvia2:0.5>&lt;lora:add_detail:0.5>&lt;lora:epiCRealismHelper:0.2> --mask_prompt windows door --mask_invert --controlnets mlsd --controlnet_weights 0.5

image

image

Here are the original images sources:

https://newyork.craigslist.org/brk/apa/d/brooklyn-expansive-loft-in-bushwick/7731612663.html

https://newyork.craigslist.org/brk/apa/d/brooklyn-below-market-basic-bedroom/7731562165.html

https://newyork.craigslist.org/mnh/apa/d/new-york-bright-corner-studio-laundry/7731512365.html

https://newyork.craigslist.org/brk/apa/d/brooklyn-bed-in-williamsburg-no-fee/7731545442.html

https://hudsonvalley.craigslist.org/apa/d/pearl-river-pearl-river-jewel-1br/7733791169.html

https://slowmotionmama.com/7-reasons-to-empty-a-space-before-decluttering/

To Summarize

The benefits of AI virtual staging are many: accelerated sales, increased property values, and a streamlined marketing experience.

Things to remember:

  • Maintain Realism: While this AI tool is powerful, it's crucial to ensure the generated virtual staging looks realistic and avoids nonsensical elements.
  • Transparency: You may choose to disclose that virtual staging is used in the listing description to build trust with potential buyers.

· 7 min read

You can now generate instant custom headshot photos for professional use in just a few clicks.

Several industries could benefit from it. Here are some key ones:

1. Online Platforms & Gig Economy:

  • Freelancers and independent contractors on platforms like Upwork or Fiverr need professional headshots for their profiles to appear credible and attract clients.
  • People signing up for ride-sharing services like Uber or Lyft often require profile pictures that meet platform guidelines.

2. Remote Work & Video Conferencing:

  • With the rise of remote work, employees need professional headshots for video conferencing platforms like Zoom or Google Meet.
  • Many companies request profile pictures for internal directories.

3. Events & Conferences:

  • Attendees at conferences or trade shows might need quick headshots for badges or presentations.
  • Event organizers may require speaker headshots for promotional materials.

4. Retail & Hospitality:

  • Retailers or restaurants can use headshot generators for employee name tags or online staff directories.

5. Education & Training:

  • Online courses or educational platforms can benefit from student profile pictures.
  • Professional development programs often require headshots for certificates or online profiles.

6. Media & Marketing:

  • Content creators or bloggers frequently need quick headshots for social media profiles or website bios.
  • Marketing agencies can use headshot generators for clients who need profile pictures on short notice.

So how do we at Astria.ai come in?

Astria’s FaceID Feature for Instant Fine-tuning

With our FaceID tool, you can instantly fine-tune your images while preserving identity in a matter of seconds. All you need is just one photograph.

alt_text

This feature comes in very handy if you need to generate images quickly and efficiently – such as if you’re offering a free-tier service in a user app and need profile images to be generated in a jiffy. It can also be applied in real-time applications like live-streaming or virtual try-ons.

In e-commerce applications, instant fine-tuning can be a game-changer as it allows users to visualize products with their own images seamlessly, enhancing the shopping experience and boosting conversion rates. In the gaming industry, instant fine-tuning can be used to create personalized gaming avatars or characters that resemble the user, thereby increasing immersion and emotional connection with the game. Additionally, social media platforms could use the FaceID feature to offer instant filters and lenses, letting users create and share more personalized content with their friends and followers.

Just one point to remember: the adapter was trained on human faces, so best not to try faces of your pets or other subjects at the moment. A few other points to note:

  • FaceID can work with Face Swap to improve similarity. Disable Face Swap in case your prompt is animation style.
  • For fast generation, use LCM schedulers.
  • For realistic images, enable Face-Correct to improve the facial features.

FaceID vs Full Fine-Tuning

Astria offers full fine-tuning tools using the Dreambooth API. This is a technique that updates the entire Stable Diffusion model by training on just a few images of a subject or style. This is a pretty efficient way of fine-tuning as it allows for the generation of realistic and diverse images of the specific subjects or concepts.

Apart from this, Astria also has the option of LoRA fine-tuning. In this technique, instead of fine-tuning the entire model, a low-rank adapter layer is inserted into the model architecture. This reduces the computational time and storage requirements leading to a lower cost of fine-tuning.

Both the techniques above are well suited for high fidelity on identity preservation of the subject images, but they take around 5-10 minutes for process completion and, therefore, we have FaceID for instant results.

FaceID does not involve training of the model at all. Under the hood it only calculates and retains the embeddings of the training images, and then reproduces these embeddings during inference. This way the Stable Diffusion model doesn’t have to go through any changes in its weights, and that’s why the fine-tuning process is so rapid. It takes less than 10 seconds for a FaceID based fine-tune to be created.

Guide to Using FaceID on Astria.ai

As mentioned before, the FaceID fine-tune can be done with just one image. But, for the sake of fidelity, we’ve taken 3 images of a model from Unsplash. Here are the input images:

alt_text

Now head over to the New Finetune section.

alt_text

Under the Advanced features, select the Model type as FaceID. Remember to provide the Class name (woman, in this case).

Your tune will be ready in a matter of seconds.

Here’s the API to create the tune:

curl -X POST -H "Authorization: Bearer $API_KEY" https://api.astria.ai/tunes \
-F tune[title]="Unsplash Model Female - 1" \
-F tune[name]=woman \
-F tune[base_tune_id]=690204 \
-F tune[images][0]="@1.jpg" \
-F tune[images][1]="@2.jpg" \
-F tune[images][2]="@3.jpg" \

Base_tune_id = 69024 refers to the Realistic Vision V5.1 (VAE) model that we used as the base model. You can check out the list of available models here.

alt_text

Let’s start prompting with some real-life use cases, where instant headshot generation would be useful.

Use-Case 1: Professional Networking

Prompt: A professional headshot of a female software engineer, wearing a blue blazer, with a friendly smile and confident gaze, studio lighting, high-resolution, 8k, sharp focus, Nikon D850, 85mm lens, f/1.8, 1/200s, ISO 100 &lt;faceid:1155049:1.0> **(replace this with the faceid number of your tune**)

Negative Prompt: unprofessional, casual, blurry, low-resolution, poor lighting, unflattering angles, awkward pose, unfriendly expression, distracting background, snapshot, amateur, overexposed, underexposed, harsh shadows, uneven skin tone

API to create the prompt:

curl -X POST -H "Authorization: Bearer $API_KEY" https://api.astria.ai/tunes/1155049/prompts \
-F prompt[text]="A professional headshot of a female software engineer, wearing a blue blazer, with a friendly smile and confident gaze, studio lighting, high-resolution, 8k, sharp focus, Nikon D850, 85mm lens, f/1.8, 1/200s, ISO 100 <faceid:1155049:1.0>" \
-F prompt[negative_prompt]="unprofessional, casual, blurry, low-resolution, poor lighting, unflattering angles, awkward pose, unfriendly expression, distracting background, snapshot, amateur, overexposed, underexposed, harsh shadows, uneven skin tone" \
-F prompt[super_resolution]=true \
-F prompt[face_correct]=true \

Note the number 1155049 refers to the tune number. Replace it with the tune number of your own fine-tune.

alt_text

Use-Case 2: Fitness & Wellness Coach

Prompt: A vibrant and inspiring headshot of a fitness coach, wearing a bright green athletic top, with an energetic smile and motivated expression, outdoor natural lighting, high-resolution, 8k, sharp focus, Nikon Z7 II, 85mm lens, f/2.8, 1/200s, ISO 200, vivid color palette, blurred park background, sun flare&lt;faceid:1155049:1.0>

Negative: unhealthy, unmotivated, low-energy, poorly lit, low-quality, blurry, awkward pose, unflattering angles, harsh shadows, distracting background, snapshot, amateur, overexposed, underexposed, uneven skin tone, no retouching, no visible workout equipment

alt_text

Use-Case 3: Social Media and Marketing Influencer

Prompt: A vibrant and engaging headshot of a female fashion influencer, wearing a stylish red dress, with a charming smile and confident pose, golden hour lighting, high-resolution, 8k, sharp focus, Canon EOS R5, 50mm lens, f/1.4, 1/160s, ISO 100, cinematic color grading, bokeh background &lt;faceid:1155049:1.0>

Negative: unfashionable, poorly lit, low-quality, blurry, awkward pose, unflattering angles, dull colors, flat lighting, distracting background, snapshot, amateur, overexposed, underexposed, harsh shadows, uneven skin tone, no makeup, no retouching

alt_text

Use-Case 4: Educational Platform & Online Learning

Prompt: A friendly and approachable headshot of a female history professor, wearing a navy blue sweater, with a warm smile and inviting gaze, soft natural lighting, high-resolution, 8k, sharp focus, Sony A7R IV, 85mm lens, f/2.8, 1/125s, ISO 200, neutral color palette, clean background&lt;faceid:1155049:1.0>

Negative: intimidating, unapproachable, unprofessional, poorly lit, low-quality, blurry, awkward pose, unflattering angles, harsh shadows, distracting background, snapshot, amateur, overexposed, underexposed, uneven skin tone, no retouching

alt_text

Why Implement Astria’s FaceID in Your Tech Stack

By implementing FaceID in your tech stack, you unlock the power of real-time, high-quality image generation. Consider the possibilities:

  1. Professional Networking
  2. Social Media and Influencer Marketing
  3. Educational Platforms
  4. Fitness and Wellness Apps
  5. Event Apps
  6. E-commerce Apps
  7. Free-Tier Services

Integrating FaceID into your application is a straightforward process, thanks to Astria.ai’s developer-friendly API. With just a few lines of code, you can integrate the feature into your tech stack, letting your users generate portraits with minimal waiting time.

· 12 min read

Today, we’ll demonstrate how you can generate on-brand corporate headshots of yourself, your colleagues and clients using Astria.ai. You no longer need to dress up and conduct photoshoots; we can help you create professional-looking photos for your website, newsletter, PR, social media, and more simply with the help of a few prompts.

Why Are On-Brand Photographs Necessary?

On-brand photographs are important because they visually communicate a brand's identity and values. Companies benefit from professional headshots for several reasons:

  • Projecting a Professional Image: A polished headshot makes a strong first impression. It shows clients and potential customers that the company takes itself seriously and is invested in presenting a professional image.
  • Building Trust and Credibility: Seeing the faces of the people behind the company helps build trust and credibility. Potential clients feel more comfortable doing business with a company that has a human face.
  • Enhancing Your Brand: Headshots can be used on a company website, social media platforms, and marketing materials. Consistent, high-quality headshots contribute to a company's overall brand identity.
  • Recruiting Talent: Professional headshots on a careers page can attract qualified candidates. It shows potential employees that the company is professional and cares about its image.
  • Boosting Employee Morale: Investing in professional headshots can boost employee morale. It shows that the company values its employees and wants to present them in the best light.

Off-Brand Photos vs. On-Brand Photos

  • Off-brand: Poor lighting, unprofessional attire, cluttered backgrounds, or generic stock photos that don't reflect the company's unique style.
  • On-brand: Photos that use the company's color palette, incorporate the logo subtly, and look formal in a setting that reflects the company culture (casual startup vs. traditional office).

Think of on-brand photos as the building blocks of your company's visual story. They shape how the world perceives you, your work, and your brand’s values.

The following are examples of off-brand images: walking in the park, listening to music, playing ukulele, or reading a book.

A woman walking in a park

A man listening to music in a park

A woman walking in a park
A man listening to music in a park

A woman walking in a park

A man listening to music in a park

A man playing Ukulele
A woman reading a book

On-brand headshots of these same people would look something like this:

A woman walking in a park

A man listening to music in a park

A woman walking in a park

A man listening to music in a park

Now, wouldn’t it be awesome if you could generate corporate headshots like these quickly and efficiently?

That’s where we, Astria.ai, come in.

Key Features of Astria.ai’s Platform

Astria.ai specializes in generating Stable Diffusion images at breakneck speed. First, you get premium results. Second, you can bring your still photographs to life. Third, our API is quick and simple to use. Our key features are:

  1. Backend V1: Currently in beta, this feature helps you to completely rewrite the original image inference and processing pipeline. See the details here.
  2. Face Inpainting: Face inpainting will try to detect a human face in the picture, and then run a second inference on top of the detected face to improve facial features. It requires the super-resolution toggle to be turned on in order to get more pixels to work with.
  3. Face Swap: Face-swap uses training images to enhance resemblance to the subject.
  4. Face ID: This is a model adapter allowing you to generate an image while preserving identity without fine-tuning. It’s been trained on only human faces.
  5. Latent Consistency Models: This is a combination of a scheduler and a LoRA which allows image generation in 5-6 steps, thus reducing processing time.
  6. LoRAs: LoRAs can be used to improve the quality of the image or deepen the desired style. We provide a LoRA gallery and allow importing external LoRAs.
  7. Multi-Controlnet: Use this tool to get better consistency and precision. See the syntax here.
  8. Multi-Pass Inference: Currently in beta, this is a unique feature that allows you to generate a background image separately from the person in the foreground.
  9. Multi-Person Inference: Also in beta, it is a feature that allows you to generate images with multiple people in them.
  10. Prompt Masking: This uses a short text to create a mask from the input image. The mask can be used to inpaint parts of the image. The most popular use cases are product shots and Masked Portraits.
  11. Tiled Upscale: A beta feature to improve image resolution.

Step-by-Step Process to Generate On-Brand Headshots

Step 1: Collecting Images

To get started, we collected images of 4 different people from the free image websites Pixabay and Pexels.

Step 2: Training

Next, we will fine-tune all the 4 subjects.

alt_text

Title: Give an appropriate title.

Class Name: Select the correct class name from the dropdown menu. In our example, we have 2 male models and 2 female models, so we selected accordingly.

Images: You can upload any number between 4 and 30 images. In this case, we have:

Male Model 1: 20 images Male Model 2: 14 images Female Model 1: 7 images Female Model 2: 6 images

Advanced Options

alt_text

Base Fine-tune: We shall be using the Realistic Vision V5.1 V5.1 (VAE) model.

Model Type: Among Checkpoint, LoRA (BETA), LoRA + Embedding - SDXL, and FaceID (free) from the dropdown, we are choosing Checkpoint.

Steps: We advise going with the default setting here.

Token: The token used here is “ohwx”. Remember to use this for all Stable Diffusion prompts as an instance token for the naming process during training. “ohwx” is utilized as a token to associate subjects or concepts with specific identifiers during training.

Face Detection: This tool enhances face detection for training faces for different classes. Make sure not to crop the images before uploading.

Face Correct: This tool enhances training images when the input images are low quality or low resolution. But since it can result in over-smoothing, we have not opted for it.

To know more about the dos and don’ts of AI Photoshoots, visit our documentation.

Step 3: Creating On-Brand Images

Now that the fine-tuned models are ready, we’re all set to generate some awesome headshots.

alt_text

Let’s select the fine-tuned models one-by-one, and create the corresponding on-brand headshots.

Click on Fine-tune, then move to: On brand image: Pexel Woman.

alt_text

Detailed Description: Every image will require a different prompt. See the prompts we have used below.

Negative Prompts: This comprises the characteristics that you do not want in your output images. In this case, we entered the following:

old, wrinkles, mole, blemish,(oversmoothed, 3d render) scar, sad, severe, 2d, sketch, painting, digital art, drawing, disfigured, elongated body (deformed iris, deformed pupils, semi-realistic, cgi, sketch, cartoon, drawing, anime), text, cropped, out of frame, worst quality, low quality, jpeg artifacts, ugly, duplicate, morbid, mutilated, (extra fingers, mutated hands, poorly drawn hands, poorly drawn face), mutation, deformed, (blurry), dehydrated, bad anatomy, bad proportions, (extra limbs), cloned face, disfigured, gross proportions, (malformed limbs, missing arms, missing legs, extra arms, extra legs, fused fingers, too many fingers, NSFW), nude, underwear, muscular, elongated body, high contrast, airbrushed, blurry, disfigured, cartoon, blurry, dark lighting, low quality, low resolution, cropped, text, caption, signature, clay, kitsch, oversaturated

Model: There are different Stable Diffusion models you can choose from. We used Realistic Vision V5.1 V5.1 (VAE).

ControlNet/Img2Img

alt_text

Image URL: This is the place to upload a reference image, or the image you would like the final output to be based on. You could also use a URL instead. In addition to the detailed description and negative prompts, the model will refer to this image while generating the new images.

Mask URL: Image masking is used to isolate specific areas of an image from the rest, allowing for more precise editing. It’s like placing a “mask” over the parts of a picture you want to protect or hide while exposing the other areas for editing. In this case, we have left it blank.

Prompt Strength: This is denoising strength. If you input 1 here, it will take the prompt and ignore the reference image. We are using the default: 0.8.

ControlNet Hint: In the dropdown you will note the following options: Pose, Depth, Tile, Line art - Edge, Canny - Edge detection, MLSD - for architecture, HED boundaries, and QR Code. We used ‘Pose’ because we are creating professional headshots.

ControlNet Conditioning Scale: We have used the default: 0.8.

TXT2IMG: If you want to use this instead of Img2Img, then toggle on. In our case, we have used a reference image, so it is toggled off.

Advanced

alt_text

Color Grading: We have 3 color grading options - Film Velvia, Film Portra, and Ektar. In this case, we’ve left it blank so that the model can take the inference from the reference image.

Width: This will set the width of the image. We have left it blank.

Height: This will set the height of the image. We have left it blank.

Number of Images: The number of images can be selected from among the options - 1,2,3,4, and 8. We selected 2.

Steps: This ranges from 10 - 50. We have kept the default: 50.

Seed: The default is 42.

Cfg Scale: This ranges from 0-20; the default is 7.5.

Scheduler: Among euler, euler_a, dpm++2m_karras, dpm++sde_karras, dpm__2m, dpm++sde, and lcm, the default is euler_a. We’ve kept the default.

Weighted Prompts: You can enable the weighted prompts, but in our case, it is disabled.

Film Grain: This adds noise to the image. We toggled on.

Super Resolution (X4): This increases the resolution. We toggled on.

Super Resolution Details: This is used along with Super Resolution (X4). This is toggled on.

Inpaint Faces: This improves details on faces. It is toggled on.

Face Correct: This does face restoration. It is toggled on.

Face Swap: This uses training images to further enhance resemblance to the subject. This is toggled off.

Now let’s get to the detailed descriptions. Let’s see what prompts work and what headshots they generate - all of them on-brand in our case.

Detailed Description for Man:

portrait of (ohwx man) wearing a lawyer suit, bookshelf background, professional photo, white background, Amazing Details, Best Quality, 80mm Sigma f/1.4 or any ZEISS lens --tiled upscale

Detailed Description for Woman:

portrait of (ohwx woman) wearing a lawyer suit, bookshelf background, professional photo, white background, Amazing Details, Best Quality, 80mm Sigma f/1.4 or any ZEISS lens --tiled upscale

Images:

Image 1

Image 2

Image 3

Image 4

On-Brand Image: Corporate Headshots

Detailed Description for Man:

portrait of (ohwx man) wearing a business suit, professional photo, white background, Amazing Details, Best Quality, Masterpiece, dramatic lighting highly detailed, analog photo, overglaze, 80mm Sigma f/1.4 or any ZEISS lens

Detailed Description for Woman:

portrait of (ohwx woman) wearing a business suit, businesswoman, professional photo, white background, Amazing Details, Best Quality,  80mm Sigma f/1.4 or any ZEISS lens  --tiled upscale

Images:

Image 1

Image 2

Image 3

Image 4

On-Brand Image: Healthcare

Detailed Description for Man:

portrait of (ohwx man) wearing a labcoat,smiling, hospital, intricate details, symmetrical eyes, professional photo, detailed background, detailed fingers, detailed face,  Amazing Details, Best Quality,  ZEISS lens,8k high definition  --tiled upscale

Detailed Description for Woman:

portrait of (ohwx woman) wearing a labcoat,smiling, hospital, intricate details, symmetrical eyes, professional photo, detailed background, detailed fingers, detailed face,  Amazing Details, Best Quality, ZEISS lens, 8k high definition --tiled upscale

Images:

Image 1

Image 2

Image 3

Image 4

On-Brand Image: Manufacturing

Detailed Description for Man:

portrait of (ohwx man) wearing shirt and trousers,factory background, manufacturing professional,smiling, symmetrical eyes,detailed fingers, detailed hands, professional photo, Amazing Details, Best Quality, 80mm Sigma f/1.4 or any ZEISS lens --tiled upscale

Detailed Description for Woman:

portrait of (ohwx woman) wearing shirt and trousers,manufacturing professional,smiling, symmetrical eyes,detailed fingers, detailed hands, professional photo,  Amazing Details, Best Quality,  80mm Sigma f/1.4 or any ZEISS lens --tiled upscale

Images:

Image 1

Image 2

Image 3

Image 4

To Summarize

There are several potential benefits to using Astria for corporate headshots over traditional photography shoots:

  • Cost-Effectiveness: AI-generated headshots can be significantly cheaper than hiring a professional photographer, renting a studio, and so on
  • Scalability: AI can generate a large number of headshots quickly and easily. This is especially beneficial for companies with a large number of employees.
  • Customization: With AI, you can fine-tune the generation process to create headshots that meet your specific needs. For example, you can specify the desired clothing, background, and lighting.
  • Control over Revisions: If you don't like an AI-generated headshot, you can simply generate another one. This can save time and money compared to reshooting a traditional headshot.
  • Accessibility: AI-generated headshots can be created from anywhere in the world, without the need to travel to a photography studio.

Generating corporate headshots is one of the many cool things you can do on our platform. Keep reading our other blogs to find out about our exciting new features.

· 9 min read

Welcome to Astria.ai.

In our first blog post, we’ll take a deep dive into how you can generate very detailed images using a multi-pass inference method. We’ll show you how to structure high-quality prompts to generate visuals of professional quality.

What Is Multi-Pass Inference?

First, let’s discuss what multi-pass inference is. Multi-pass inference is essentially a technique where you can generate the background of the composition independently from the foreground. On Astria.ai this control is achieved through multiple breaks in the prompting technique. The base image (i.e. the background elements) is generated separately via the first part of the prompt. Then using the next breaks in the prompt the subject is in-painted onto the base image.

Here's how multi-pass inference enhances control over the background of an image:

1. Iterative Refinement

In a multi-pass inference, you have the opportunity to adjust and refine the background in a separate pass. This iterative process allows you to steer the image generation towards your desired outcome.

2. Choice over base model

Multi-pass inference allows for choice over the base model thereby giving the users the option to use a variety of pre-trained models like Realistic Vision, Absolute Reality, and other Stable Diffusion models.

3. Increased Precision and Detailing

With multiple inference steps, you have more chances to introduce specific details or adjustments to the background. This can include changing its color scheme, adding or removing elements, or altering its overall style. Such precision is often not achievable in a single pass, where the model's output is more dependent on the initial prompt and less on a multi-step method.

4. Balancing Foreground and Background

Multi-pass inference allows for a more balanced composition between the foreground and the background so that you can modify the background in a way that it complements the foreground elements more effectively.

As an example take a look at these two images of a man wearing sportswear and posing inside a gym. The first one was generated in a single prompt, while for the second one we used a multi-pass approach.

Without multi-pass

alt_text

With multi-pass

alt_text

As you can see in the second image the background has more character to it. The elements of the gym are more prominent as compared to the former.

How Multi-Pass Inference Can Benefit Your Business

The enhanced control over image backgrounds provided by multi-pass inference offers significant benefits for businesses in various domains. By precisely tailoring image backgrounds, companies can maintain a consistent visual brand identity, crucial for marketing, advertising, and establishing a strong social media presence.

For e-commerce and retail sectors, the background of product images plays a critical role in shaping customer perception. Tailoring these backgrounds to complement the products not only enhances their appeal but also provides clearer context, which can lead to increased sales.

Moreover, multi-pass inference enables rapid and cost-effective creation of high-quality, bespoke images. This reduces the reliance on expensive photoshoots and graphic design work, presenting a more economical approach to content creation. Businesses can easily modify image backgrounds to suit various platforms and formats, such as social media, websites, and print media, ensuring optimal visual presentation across all channels.

Lastly, in a digital landscape overflowing with visual content, unique and tailored images with custom backgrounds provide businesses with a competitive edge. Such visuals are more likely to capture audience interest in a crowded market, standing out from standard, generic content. Therefore, the ability to control image backgrounds through multi-pass inference is not just a technical advantage but a strategic tool for branding, marketing, product presentation, and creating visually compelling content that differentiates a business in the market.

How Astria.ai makes Multi-pass inferencing easy

Multi-pass inferencing, particularly in the context of advanced generative models like Stable Diffusion, often requires a developer's expertise due to several technical complexities. At Astria.ai, we provide a user-friendly apis that can significantly simplify this process for users who do not possess extensive technical know-how.

Let’s first understand how a developer’s expertise is needed and then we’ll show how Astria.ai makes this process easier.

If one were to fine-tune and implement Stable Diffusion for multi-pass inferencing one would need a fair understanding of how these machine learning models work so that they can adjust parameters for different passes. This would require a fair amount of coding skills especially for customizing the inference process, integrating different components (like schedulers, encoders, decoders), and handling data preprocessing and postprocessing. Developers must be proficient in relevant programming languages and frameworks.

Moreover each pass in multi-pass inferencing may require adjustments to optimize the output. Developers need to troubleshoot issues, fine-tune parameters, and experiment with different configurations to achieve the desired results, which demands both technical skills and problem-solving abilities. Lastly, generative models can be resource-intensive. Developers need to manage and optimize the use of computational resources like GPUs, especially when working with large models or high-resolution images.

Astria.ai simplifies the above procedures by providing simple APIs that abstract the complexities of the underlying model. The platform also comes with pre-configured settings and templates showcased in the gallery that users can select from, reducing the time to do prompt engineering, and helping understand the breadth of options available. This includes predefined prompts, styles, and optimization settings. Apart from this Astria also handles the computational resource management in the background, allowing users to focus on the creative aspects of image generation without worrying about technical constraints.

Overall, while multi-pass inferencing with AI models requires considerable technical expertise due to its complexity, a platform like Astria.ai democratizes this capability by providing easy-to-use api and automated workflows, making advanced image generation accessible to developers.

Step-by-Step Guide to Creating Images for a Sportswear Brand Using Multi-Pass Inferencing

Step 1: Training

First, create a fine-tune of your subject.

alt_text

Select the model type as LORA. This is a fast and efficient way to train the model, as it only trains an adapter layer on top of the base model, instead of training all the weights which is typically the case if we select the Checkpoint Model type.

We used the following images of a male model obtained from a royalty free collection (Pixabay):

alt_text

Once the tune is ready, we can begin to prompt. Click on your tune.

alt_text

Step 2 Inference

Let’s first look at the structure of our prompt. Suppose you have to create images to market a sportswear brand.

(medium shot) of a male model wearing hiking clothes and shoes, standing in a dense forest, behind him is a small waterfall.
BREAK photorealistic and highly detailed
BREAK ohwx man wearing hiking clothes and shoes <lora:960310:1.0>
  • The first line contains the base prompt to generate the background and the overall composition.
  • The second line is a common prompt that is added both to the base prompt and the person prompt, in order to avoid repetition.
  • The third line is the person prompt, to detail how our subject is composed in the foreground. The statement - <lora:960310:1.0> - is added to load the fine-tuned model of our subject.
Negative Prompt: (brand logos on t-shirt), (worst quality, greyscale), watermark, username, signature, text, bad anatomy, bad hands, text, error, missing fingers, extra digit, fewer digits, cropped, jpeg artifacts, bad feet, extra fingers, mutated hands, poorly drawn hands, bad proportions, extra limbs, disfigured, bad anatomy, gross proportions, malformed limbs, missing arms, missing legs, extra arms, extra legs, mutated hands, fused fingers, too many fingers, long neck

The negative prompt is a list of prompts we want to avoid in our generated image. Anything placed in parentheses applies extra weights to that prompt.

We can add an input image if we want our generated image to follow an input template. On the ControlNet Hint dropdown menu, we can select pose, if we want to copy the pose of the subject from the input image. Select the Text2img toggle to be true, that’ll preserve the pose of the image. (recommended). If you want the semantics i.e. the looks and feels of the original image as well, then go for Img2img.

For example, let’s take this pose as our input image:

alt_text

Also, keep the Inpaint Faces and Face Swap toggle on. Inpaint Faces iterates one more time over the faces of the subject to ensure that there is no distortion in the outcome, while the Face Swap option ensures that the face of our model is taken from the training images and swapped in the generated image to enhance resemblance in the final output.

Let’s look at the result of our first prompt:

alt_text

As you can see, the ControlNet has ensured that the output pose is similar to the pose of the input image.

Step 3: Examples

Prompt 2:

a man at the finish line of a race on an olympic track
BREAK sharp details
BREAK ohwx man wearing running clothes and shoes, jubilant expression on his face&lt;lora:960310:1.0>

Negative: anime, cartoon, graphic, text, painting, crayon, graphite, abstract, glitch, deformed, mutated, ugly, long neck, disfigured, fused lips,

alt_text

Prompt 3:

full body workout in a vibrant gym, action, perspective, speed, movement, ripped, push ups fit
BREAK sharp details, realistic image, Porta 160 color, ARRI ALEXA 65
BREAK ohwx man doing push-ups, intense look on his face <lora:960310:1.0>

Negative: anime, cartoon, graphic, text, painting, crayon, graphite, abstract, glitch, deformed, mutated, ugly, long neck, disfigured, fused lips,

alt_text

Prompt 4: (wide shot) of a man walking at night on the streets of New York, warm lighting, photorealistic

BREAK
BREAK ohwx man wearing casual sports wear&lt;lora:960310:1.0>
Negative: hat, cartoon, ugly

alt_text

Final Note

The above steps can be used to generate product photography or e-commerce images. With multi-pass inference, you can gain a huge amount of control over your image backgrounds vis a vis the foreground. This technique allows you to iteratively refine and tailor the background details, ensuring that they align with your vision and objectives.

Whether you're looking to create images for branding, marketing, storytelling, or artistic expression, multi-pass inference by Astria.ai provides the flexibility and precision to shape the background just as you need it. You can now harness this tool to bring depth, context, and nuance to your visual content, making your image speak in harmony with your creative goals.